 |
|
|
| |
 |
|
[Math+Magic]™ Pro Edition for Adobe InDesign for Windows
|
|
MathMagic Pro Edition v8.9 for Adobe InDesign
with MathMagic Plug-ins for InDesign
New CC 2023 (64-bit versions)
CC 2022 (64-bit versions)
CC 2021 (64-bit versions)
CC 2020 (64-bit versions)
CC 2019 (32-bit & 64-bit versions)
CC 2018 (32-bit & 64-bit versions)
CC 2017 (32-bit & 64-bit versions)
CC 2015 (32-bit & 64-bit versions)
CC 2014 (32-bit & 64-bit versions)
CC (32-bit & 64-bit versions)
CS3, CS4, CS5, CS5.5, CS6
Date of Release: Nov-18-2022
|
|
Thank you for choosing MathMagic, the ultimate equation editor on the planet!
MathMagic Pro Edition for Adobe InDesign is an equation editor mainly for use with Adobe InDesign software in editing any mathematical expressions and symbols with WYSIWYG interface and various
powerful features.
|
|
|
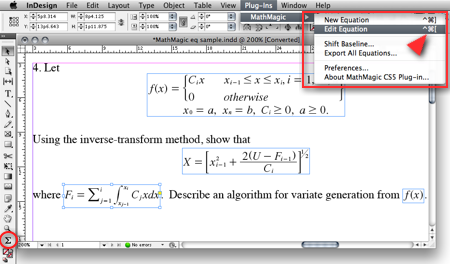
(InDesign window and menubar with MathMagic Plug-in menu)
|
|
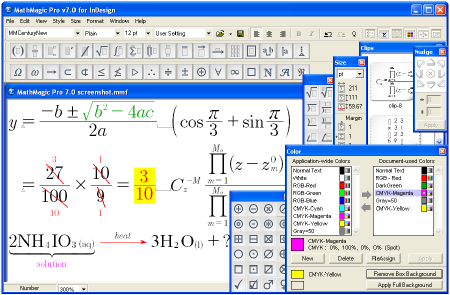
(MathMagic Main Editor window)
|
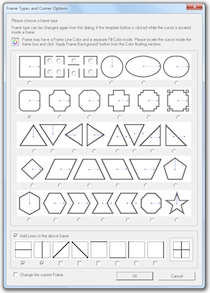

(Frame and Border Types) (Vertical Fence Types)
|
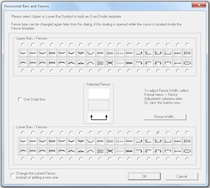
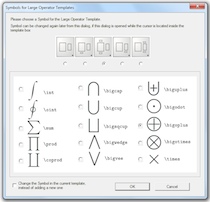
(Horizontal Fences, Decor Shapes) (Large Operator Symbols)
|
| * What's New (v8.9 - November 18, 2022) |
- Added: Supports Adobe InDesign CC 2023.
- Added: Some more fonts added for SVG embedding.
- Fixed: SVG drawing improved for a few templates.
- Fixed: Communication issue with InDesign CC 2023.
InDesign Plug-ins :
- Added: MathMagic CC2023 plug-in added for Adobe InDesign CC 2023.
|
For the full history of changes, please read the Version History file.
|
|
|
* How to Install
|
- Please read below (How MathMagic Pro works - 1. Installing) for more details.
- If installing on Windows XP,
- Download the latest Installer from download page
- Double click on the installer icon to proceed the installation
- Install MathMagic Plug-in manually, Set the path in the Preferences dialog. (read below)
- Launch MathMagic application from Windows Start menu or from the following location:
\Program Files (x86)\MathMagic Pro Edition\
|
- If installing on Windows Vista or newer,
- Download the latest Installer from download page
- Double click on the installer icon to proceed the installation.
- Install MathMagic Plug-in manually, Set the path in the Preferences dialog. (read below)
- After installation, select MathMagic application from the following location:
\Program Files (x86)\MathMagic Pro Edition\
- Right-click on it, select 'Properties'.
- Select "Windows XP SP3" compatibility mode, and turn on "Run as an Administrator" privilege.
(This is to make MathMagic read/write Registry correctly. Otherwise, Registry error message might be displayed.)
- Then, launch MathMagic application.
|
- How to install MathMagic Plug-in
- If running on Windows 7, 8 or Windows Vista, please set the Properties of your InDesign application first. This is to make InDesign appplication can talk to the external MathMagic Pro application and also let MathMagic Plug-in save the Preferences file correctly.
- right-click on InDesgin CCx.exe application, select 'Properties', from
\Program Files\Adobe\InDesign CCx.exe
- Select "Windows XP SP3" compatibility mode, and turn on "Run as an Administrator" privilege.
- The correct version of MathMagic plug-in should be manually installed by copying from
\Program Files (x86)\MathMagic Pro Edition\Plug-ins\ folder
to \Adobe\InDesign CCx\Plug-ins\ folder.
* The whole plug-in folder of "MathMagic CC20xx" should be copied, instead of copying files from inside the "MathMagic CC20xx" folder.
(If for InDesign CC2019 or older with 64-bit InDesign,
"MathMagic CCxxxx-64bit" plug-in folder should be installed, instead of 32-bit of "MathMagic CCxxxx" folder. If InDesign CC2020 or newer, only 64-bit plug-ins available.)
- Then, set the path to MathMagic Pro v8.8 InD.exe application, from the
InDesign menubar -> Plug-ins -> MathMagic -> Preferences... dialog: Click "Find" button.
|
|
|
|
|
1. Installing
- Install MathMagic Pro for InDesign for Windows using the latest MathMagic Pro installer.
- Manually install MathMagic plug-in in the following location.
- copy "MathMagic CC" or "MathMagic CSx" folder itself from
\Program Files (x86)\MathMagic Pro Edition\Plug-ins\ folder
- and paste(or simply drag&drop) it into your
\Adobe InDesign CC folder\Plug-ins\ folder
or \Adobe InDesign CSx folder\Plug-ins\ folder
- Then, launch your InDesign application. Once the MahgMagic plugin is installed and loaded correctly, you should see.
InDesign menubar -> Plug-ins -> MathMagic sub menu.
- Then, please choose : InDesign menubar -> Plug-ins -> MathMagic -> Preferences dialog: click "Find" button to select the path to the external MathMagic Pro application, which is typically
\Program Files (x86)\MathMagic Pro Edition\MathMagic Pro 8.x InD.exe
- Then, all your initial setting should be done if you are running Windows XP.
- If running on Vista or Windows 7, please read above (* How to Install) to set the Admin setting in the Properties window of both MathMagic Pro application and InDesign appliation.
- Please read the License email or ReadMe First file for more information, located in
\Program Files (x86)\MathMagic Pro Edition\ folder
2. Creating Equations
- Launch Adobe InDesign application(CSx or CCx).
- Make a new InDesign document
or open a document.
- Select the Plug-ins menu
-> MathMagic sub-menu.
- Choose "New Equation" item
to create an equation.
If the cursor is located in the text box,
the equation will be inserted in the cursor
position as an In-Line Graphic(ILG). Otherwise,
the equation will be placed as an EPS
graphic on where you click the mouse.
- You may select the Sigma
tool button from the floating main toolbar
to create an equation box, and then drag
a rectangle in the document to specify
the location of an equation once created
by the external MathMagic Pro.
- You may also right button click while the cursor is in the text box, so that you can choose the "New Equation" from the contextual menu.
- If you either select "New Equation" menu or drag a rectangle with th Sigma tool, MathMagic Pro application will be launched, if not running already, and an empty equation editor window will be opened. In case MathMagic Pro application is not launched automatically within a few seconds, please launch the application manually from the following location.
\Program Files (x86)\MathMagic Pro Edition\MathMagic Pro 8.x InD.exe
- Enter any equation in the
MathMagic editor window, and then Close(ctrl-W)
or Save(ctrl-S) the window. This will send
the equation to the InDesign document
back.
3. Editing Equations
- Choose "Edit Equation..."
item to edit the currently selected equation.
Or, just double-click on the equation
box to open it with the external MathMagic
Pro application for editing. You may also
control-click on the equation to bring
up the contextual menu, after changing
the cursor to the Arrow tool.
- After creating or editing
of equation with the external MathMagic
Pro, just press control-S and then the equation is placed in the
InDesign document.
- The baseline of all equations
will be automatically adjusted. But if
you want to lower or raise the baseline,
you may do so.
- just change the cursor
to the arrow cursor and move the equation
box by dragging to where you desire,
or
- control-click on the
equation box to bring up the contextual
menu, and then select "Shift Baseline"
item, or
- select an equation
box and choose "Shift Baseline" menu
from the MathMagic plug-in menu
4. Changing the Baseline and Bounding margins
- The baseline of all equations
will be automatically adjusted. But if
you want to lower or raise the baseline,
you may do so.
- just change the cursor
to the arrow cursor and move the equation
box by dragging to where you desire,
or
- control-click on the
equation box to bring up the contextual
menu, and then select "Shift Baseline"
item, or
- select an equation
box and choose "Shift Baseline" menu
from the MathMagic plug-in menu
- You may also customize the bounding margin gaps(left, right, top, bottom) of the equation, by specifying other value from the last item of Define Spacing window.
5. Assigning Shortcut keys to MathMagic menu items
- Install MathMagic plug-in by the instruction
- Launch InDesign application and make sure that MathMagic plug-in is loaded under Plug-Ins menu.
- Select Edit -> Keyboard Shortcuts... menu item from InDesign's menubar.
- In the "Keyboard Shortcuts" dialog, click "Product Area" popup menu, and select "MathMagic" item.
- Assign your preferred shortcut key, such as "ctrl-shift-]" for "New Equation", "ctrl-shift-[" for "Edit Equation".
|
|
| * System Requirements |
- Pentium or Faster
- Windows XP SP2 or newer including Vista, 7, 8, 10
- Adobe InDesign™ CS3 ~ CS6, CC, CC 2014, CC 2015, CC 2017, CC 2018, CC 2019, CC 2020, CC 2021, CC 2022, CC 2023
- About 60MB of hard disk space for a complete installation
- Microsoft Visual C++ 2005 SP1 Redistributable Package
|
|
|
|
* What is MathMagic, or [Math+Magic]™
|
Copy And Paste Screenshot Verified -
First, it is essential to understand what happens the moment you press the screenshot key. On Windows, pressing the "Print Screen" key copies an image of your entire display onto the system clipboard—a temporary storage area in your computer's memory. More advanced tools like the Snipping Tool or Snip & Sketch (Windows + Shift + S) allow you to copy only a selected region. On a Mac, the command Shift + Control + 4 copies a selected area directly to the clipboard without saving a file to the desktop. On smartphones, taking a screenshot saves it to your photo gallery, but the system automatically places a preview thumbnail for immediate sharing—a form of "copy and paste" in a mobile context. In all cases, the screenshot is temporarily held in RAM (Random Access Memory) as a standard image format like PNG, ready to be interpreted by the destination application.
In the daily rhythm of using a computer or smartphone, few actions feel as instantaneous and intuitive as taking a screenshot and sharing it. We capture a funny chat, an error message, a map location, or a news headline, then press Ctrl+V (or Cmd+V) to paste it directly into an email, a chat window, or a document. This seamless combination of "copy and paste screenshot" has become a fundamental digital reflex. However, beneath this simple action lies a fascinating interplay of history, technical design, and practical function that has fundamentally reshaped how we communicate. copy and paste screenshot
In conclusion, the ability to copy and paste a screenshot directly from the screen into a conversation represents a quiet revolution in digital literacy. It transforms a static image from a saved file into a fluid piece of information that can be shared instantly, annotated, and discarded when no longer needed. What appears to be a simple reflex is, in fact, a sophisticated design achievement: a bridge between visual perception and digital communication. The next time you press a few keys to capture and paste a moment from your screen, you are participating in a remarkably efficient and elegant system—one that has made screenshots as common in conversation as words themselves. First, it is essential to understand what happens
The technology behind this simple action continues to evolve. Modern operating systems are integrating more powerful clipboard managers (like Windows 11’s Clipboard history or third-party tools) that can store multiple screenshots and even sync them across devices. AI-assisted screenshot tools can now recognize text in a pasted screenshot, allowing a user to copy words out of an image they just captured. Some platforms, like Google Docs and Microsoft Teams, now automatically optimize pasted screenshots by compressing them or suggesting cropping options. As augmented reality and cloud-based workspaces grow, the "copy and paste screenshot" will likely become even more seamless, perhaps evolving into the ability to copy and paste live screen regions or interactive elements. On a Mac, the command Shift + Control
Despite its convenience, the "copy and paste screenshot" is not without limitations. The most significant issue is that the clipboard typically holds only one item at a time; taking a new screenshot overwrites the previous one. Additionally, not all applications accept pasted images. Many older or text-only programs (like certain coding environments or legacy forms) will reject an image paste or paste it as raw, unreadable binary data. There is also no universal standard for "paste destination"—an image pasted into a rich text editor may appear as a linked file rather than an inline image, leading to confusion. Finally, screenshots capture exactly what is on the screen, which can include sensitive information (passwords, private chats, personal files) that a user might forget to redact before pasting.
The true utility of copying and pasting a screenshot instead of saving it as a file is speed and context. For example, if you encounter a software bug, you can paste the error message directly into a support email without cluttering your hard drive with hundreds of individual image files. In collaborative work, a designer can paste a UI mockup directly into a Slack channel, or a student can paste a graph from a research article into a shared document. This method reduces friction—the user stays within their workflow, and the image becomes an embedded piece of the conversation rather than an external attachment. Furthermore, because the image is in the clipboard, it can often be pasted into image editors for immediate annotation before final placement. |
|
|
|
| * Price |
|
|
- MathMagic Pro Edition: US$499.00
- With 2-year Free upgrade and Free tech support: $695.00
- 2-Month Subscription License: $100.00
- MathMagic Pro Edition Academic: US$299.00
- With 2-year Free upgrade and Free tech support: $399.00
|
For the full price information, please
visit our online store
or download the Price Table. |
|
Click
here to go to download page.
|
|
|
|
* History of Older Versions
|
|
|
|
|
[Math+Magic], MathMagic, MathMagic Personal Edition, MathMagic Pro Edition, MathMagic Prime Edition, MathMagic Pop Edition, MathMagic logo, InfoLogic and InfoLogic logo are trademarks or registered trademarks of InfoLogic, Inc.
MS Word, PowerPoint, Windows are trademarks or registered trademarks of Microsoft corp.
Adobe InDesign, Illustrator, Photoshop, Acrobat are trademarks or registered trademarks of Adobe Systems Inc.
Other trademarks may be the properties of their respective owners.
|
|
|
 |
Copyright 1998-2023. InfoLogic, Inc. All rights reserved.
[ We proudly develop Quality Products]SM
|
|
|
| |
|
|
|
